Hosting a ComfyUI Workflow via API

Motivation
This article focuses on leveraging ComfyUI beyond its basic workflow capabilities. You have created a fantastic Workflow and want to share it with the world or build an application around it. By hosting your projects and utilizing this WebSocket API concept, you can dynamically process user input to create an incredible style transfer or stunning photo effect.
Introduction
This blog post describes the basic structure of a WebSocket API that communicates with ComfyUI. Generating images through ComfyUI typically takes several seconds, and depending on the complexity of the workflow, this time can increase. We utilize a WebSocket connection to track progress and allow us to give real-time feedback to the user. Using these endpoints without a WebSocket connection is possible, but this will cost you the benefits of real-time updates.
Code for a basic WebSocket API structure can be found here: Basic WebSocket API.
Utilized ComfyUI endpoints
ComfyUI already has predefined endpoints ComfyUI endpoints, which we can target. Furthermore, ComfyUI also offers a WebSocket interface. For the API described later in this blog post, we do not need to modify this file, as it already provides everything we need.
@routes.get('/ws')⇒ Returns the WebSocket object, sends status and executing messages@routes.post("/prompt")⇒ Queues prompt to workflow, returns prompt_id or error@routes.get("/history/{prompt_id}")⇒ Returns the queue or output for the given prompt_id@routes.get("/view")⇒ Returns an Image given a filename, subfolder, and type ("input", "output", "temp")@routes.post("/upload/image")⇒ Uploads an image to ComfyUI, given image_data and type ("input", "output", "temp")
API Setup
To achieve this, we first create a connection to the WebSocket path of ComfyUI within the API. This is done through the "/ws"route. We can auto-generate the client_id with an uuid for our basic API use case. And as server_address, we use our locally running ComfyUI.
pythondef open_websocket_connection():
  server_address='127.0.0.1:8188'
  client_id=str(uuid.uuid4())
  ws = websocket.WebSocket()
  ws.connect("ws://{}/ws?clientId={}".format(server_address, client_id))
  return ws, server_address, client_id
API endpoints
Queue Prompt
Sends a prompt to a ComfyUI to place it into the workflow queue via the "/prompt" endpoint given by ComfyUI. The parameters are the prompt, which is the whole workflow JSON; client_id, which we generated; and the server_address of the running ComfyUI instance
pythondef queue_prompt(prompt, client_id, server_address):
  p = {"prompt": prompt, "client_id": client_id}
  headers = {'Content-Type': 'application/json'}
  data = json.dumps(p).encode('utf-8')
  req =  urllib.request.Request("http://{}/prompt".format(server_address), data=data, headers=headers)
  return json.loads(urllib.request.urlopen(req).read())
Get History
Fetches the history to a given prompt ID from ComfyUI via the "/history/{prompt_id}" endpoint. As parameters, it receives the ID of a prompt and the server_address of the running ComfyUI Server. ComfyUI returns a JSON with relevant Output data, e.g., the Images with filename and directory, which we can then use to fetch those images.
pythondef get_history(prompt_id, server_address):
  with urllib.request.urlopen("http://{}/history/{}".format(server_address, prompt_id)) as response:
      return json.loads(response.read())
Get Image
Retrieves an image from ComfyUI based on path, filename, and type from ComfyUI via the "/view" endpoint. ComfyUI returns the raw image data.
pythondef get_image(filename, subfolder, folder_type, server_address):
  data = {"filename": filename, "subfolder": subfolder, "type": folder_type}
  url_values = urllib.parse.urlencode(data)
  with urllib.request.urlopen("http://{}/view?{}".format(server_address, url_values)) as response:
      return response.read()
Upload Image
Uploads an image to ComfyUI using multipart/form-data encoding via the "/upload/image" endpoint. This function opens an image file from the specified path and uploads it to ComfyUI. As params, we specify the input_path, which is the path to the image file we want to upload, the name, which will be the filename of the uploaded image and server_address for running ComfyUI. As optional params, we can define if we want to Upload the image into a different directory ("output", "temp") and if we want to overwrite an existing image for that path and filename. The image is uploaded as 'image/png'.
pythondef upload_image(input_path, name, server_address, image_type="input", overwrite=False):
  with open(input_path, 'rb') as file:
    multipart_data = MultipartEncoder(
      fields= {
        'image': (name, file, 'image/png'),
        'type': image_type,
        'overwrite': str(overwrite).lower()
      }
    )

    data = multipart_data
    headers = { 'Content-Type': multipart_data.content_type }
    request = urllib.request.Request("http://{}/upload/image".format(server_address), data=data, headers=headers)
    with urllib.request.urlopen(request) as response:
      return response.read()
API Workflow
To use ComfyUI workflow via the API, save the Workflow with the Save (API Format). If you don't have this button, you must enable the "Dev mode Options" by clicking the Settings button on the top right (gear icon). Check the setting option "Enable Dev Mode options". After that, the Button Save (API Format) should appear.

Basic prompt to image generation
As a first step, we have to load our workflow JSON. In my case I have an folder at the root level of my API where i keep my Workflows.
pythondef load_workflow(workflow_path):
  try:
      with open(workflow_path, 'r') as file:
          workflow = json.load(file)
          return json.dumps(workflow)
  except FileNotFoundError:
      print(f"The file {workflow_path} was not found.")
      return None
  except json.JSONDecodeError:
      print(f"The file {workflow_path} contains invalid JSON.")
      return None
Manipulating workflow
The goal is to reuse a defined workflow over and over but also be able to change the positive and negative prompts to generate different images. The technique can also be used to change other aspects of the workflow according to your needs, like the "cfg" or "steps". You need to find the relevant nodes in your workflow and adjust the values. One important aspect is that the seed has to be regenerated every time since ComfyUI will not generate a new Image if the seed hasn't changed.
pythondef prompt_to_image(workflow, positve_prompt, negative_prompt='', save_previews=False):
  prompt = json.loads(workflow)
  id_to_class_type = {id: details['class_type'] for id, details in prompt.items()}
  k_sampler = [key for key, value in id_to_class_type.items() if value == 'KSampler'][0]
  prompt.get(k_sampler)['inputs']['seed'] = random.randint(10**14, 10**15 - 1)
  postive_input_id = prompt.get(k_sampler)['inputs']['positive'][0]
  prompt.get(postive_input_id)['inputs']['text'] = positve_prompt

  if negative_prompt != '':
    negative_input_id = prompt.get(k_sampler)['inputs']['negative'][0]
    prompt.get(negative_input_id)['inputs']['text'] = negative_prompt

  generate_image_by_prompt(prompt, './output/', save_previews)
Calling the API
pythondef generate_image_by_prompt(prompt, output_path, save_previews=False):
  try:
    ws, server_address, client_id = open_websocket_connection()
    prompt_id = queue_prompt(prompt, client_id, server_address)['prompt_id']
    track_progress(prompt, ws, prompt_id)
    images = get_images(prompt_id, server_address, save_previews)
    save_image(images, output_path, save_previews)
  finally:
ws.close()- Establish a WebSocket connection to ComfyUI
- Queue the prompt via API call
- Tracking the progress of our prompt by using the WebSocket connection
- Fetch the generated images for our prompt
- Save the Images locally
Tracking progress
The WebSocket connection enables us to track the progress of the workflow. We want to know which node we are currently on and how many nodes there are in a workflow to have an update and understanding of the progress. We also want to track the progress of the K-Sampler in detail since this is the node, which takes most of the time to finish, and we want to know at what step the K-Sampler currently is and how many steps in general there are.
pythondef track_progress(prompt, ws, prompt_id):
  node_ids = list(prompt.keys())
  finished_nodes = []

  while True:
      out = ws.recv()
      if isinstance(out, str):
          message = json.loads(out)
          if message['type'] == 'progress':
              data = message['data']
              current_step = data['value']
              print('In K-Sampler -> Step: ', current_step, ' of: ', data['max'])
          if message['type'] == 'execution_cached':
              data = message['data']
              for itm in data['nodes']:
                  if itm not in finished_nodes:
                      finished_nodes.append(itm)
                      print('Progess: ', len(finished_nodes), '/', len(node_ids), ' Tasks done')
          if message['type'] == 'executing':
              data = message['data']
              if data['node'] not in finished_nodes:
                  finished_nodes.append(data['node'])
                  print('Progess: ', len(finished_nodes), '/', len(node_ids), ' Tasks done')

              if data['node'] is None and data['prompt_id'] == prompt_id:
                  break #Execution is done
      else:
          continue
  return
Handling images
We fetch and save the images by first fetching the history for a given prompt ID. After that, we search for relevant Images in the output that the history endpoint provides us. Images from "Save Image" nodes are listed in "output". Preview Images are listed as "temp". We can specify if we want to save the previews as well. In the last step, we save the images locally in our specified output directory.
pythondef get_images(prompt_id, server_address, allow_preview = False):
  output_images = []

  history = get_history(prompt_id, server_address)[prompt_id]
  for node_id in history['outputs']:
      node_output = history['outputs'][node_id]
      output_data = {}
      if 'images' in node_output:
          for image in node_output['images']:
              if allow_preview and image['type'] == 'temp':
                  preview_data = get_image(image['filename'], image['subfolder'], image['type'], server_address)
                  output_data['image_data'] = preview_data
              if image['type'] == 'output':
                  image_data = get_image(image['filename'], image['subfolder'], image['type'], server_address)
                  output_data['image_data'] = image_data
      output_data['file_name'] = image['filename']
      output_data['type'] = image['type']
      output_images.append(output_data)

  return output_images

def save_image(images, output_path, save_previews):
  for itm in images:
      directory = os.path.join(output_path, 'temp/') if itm['type'] == 'temp' and save_previews else output_path
      os.makedirs(directory, exist_ok=True)
      try:
          image = Image.open(io.BytesIO(itm['image_data']))
          image.save(os.path.join(directory, itm['file_name']))
      except Exception as e:
          print(f"Failed to save image {itm['file_name']}: {e}")
Example

Workflow used for this example: Basic prompt-to-image workflow
- model: sdXL_v10VAEFix.safetensors
- sampler_name: dpmpp_3m_sde
- scheduler: karras
- steps: 22
- cfg: 6.2
- positive prompt changed by API to: Woman in a red dress standing in middle of a crowded place, skyscrapers in the background, cinematic, neon colors, realistic look
Basic Image to Image generation
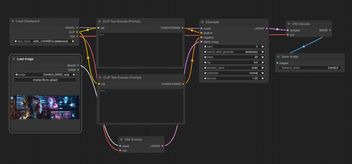
First you have to build a basic image to image workflow in ComfyUI, with an Load Image and VEA Encode like this:
Manipulating workflow
For the most part, we manipulate the workflow in the same way as we did in the prompt-to-image workflow, but we also want to be able to change the input image we use. Therefore, we need to modify the name of the image in the image loader and upload the image before queueing the prompt.
pythondef prompt_image_to_image(workflow, input_path, positve_prompt, negative_prompt='', save_previews=False):
  prompt = json.loads(workflow)
  id_to_class_type = {id: details['class_type'] for id, details in prompt.items()}
  k_sampler = [key for key, value in id_to_class_type.items() if value == 'KSampler'][0]
  prompt.get(k_sampler)['inputs']['seed'] = random.randint(10**14, 10**15 - 1)
  postive_input_id = prompt.get(k_sampler)['inputs']['positive'][0]
  prompt.get(postive_input_id)['inputs']['text'] = positve_prompt

  if negative_prompt != '':
    negative_input_id = prompt.get(k_sampler)['inputs']['negative'][0]
    prompt.get(negative_input_id)['inputs']['text'] = negative_prompt

  image_loader = [key for key, value in id_to_class_type.items() if value == 'LoadImage'][0]
  filename = input_path.split('/')[-1]
  prompt.get(image_loader)['inputs']['image'] = filename

  generate_image_by_prompt_and_image(prompt, './output/', input_path, filename, save_previews)
Calling the API
pythondef generate_image_by_prompt_and_image(prompt, output_path, input_path, filename, save_previews=False):
  try:
    ws, server_address, client_id = open_websocket_connection()
    upload_image(input_path, filename, server_address)
    prompt_id = queue_prompt(prompt, client_id, server_address)['prompt_id']
    track_progress(prompt, ws, prompt_id)
    images = get_images(prompt_id, server_address, save_previews)
    save_image(images, output_path, save_previews)
  finally:
    ws.close()
- Establish a WebSocket connection to ComfyUI
- Upload input image to ComfyUI
- Queue the prompt via API call
- Tracking the progress of our prompt by using the WebSocket connection
- Fetch the generated images for our prompt
- Save the Images locally
Example
Lets make some subtle changes to the image of the first Example. Change the color of the dress but keep the overall composition of the image.

Workflow used for this example: Basic image-to-image workflow
- model: sdXL_v10VAEFix.safetensors
- sampler_name: dpmpp_3m_sde
- scheduler: karras
- steps: 22
- cfg: 8
- diffusion: 0.6
- positive prompt changed by API to: Woman in a white dress standing in middle of a crowded place, skyscrapers in the background, cinematic, monotone colors, dark, dystopian
Outcome
As you can see hosting your ComfyUI workflow and putting it behind an API is a straightforward task. Devil is in details e.g. when you want to work with custom nodes and models but everything is doable.
If you have any questions or even an interesting project feel free to ping us https://9elements.com/contact/