AI clothes swaps with Flux Redux & Flux Fill
We have all seen amazing artistic or realistic images generated by AI. However, one main challenge for AI image generation is to find use cases that solve problems or boost process performance. One such use case is changing a Model's clothes to your desire while keeping the overall image intact. This can be a massive benefit for the fashion industry and e-commerce domain. This post will describe the general idea behind the setup used for clothes replacement and some challenges and possible fixes.
Use Cases
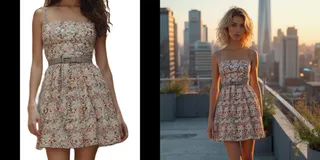
This blog post focused on replacing or swapping clothes from Person A to Person B. Using a ComfyUI workflow like this, it is also possible to replace a Person's clothes with a “Product Shot” of a clothing piece.
Virtual Try-On: One of the main problems of online shopping is the lack of ability to try on clothes to see if the color or fitting would suit you. AI clothes replacement can mitigate this, leading to better customer experience and reduced returns. Additionally, it could be extended with personal AI fashion assistants to provide feedback or search for similar clothing pieces.
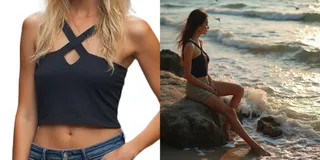
Fashion Campaigns: Booking models, locations, and photographs for a campaign can be expensive and time-consuming, especially for smaller brands. For viral or trending campaigns, it is vital to be fast; with clothes replacements, it is possible to recreate viral Memes or trends with your fashion. In the early stages of a campaign concept, it can help to test different ideas in a more realistic setting.
Storytelling/Education: Clothe replacements can be used as digital installations to show historical wardrobes for educational purposes. It can also be used in storytelling scenarios, especially in addition to consistent character techniques to create fitting images for your story.
Setup/Workflow
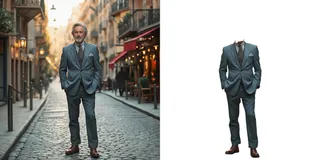
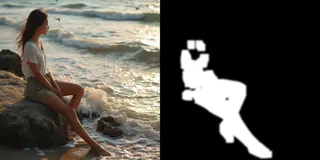
This workflow aims to replace the clothes from an Image of Person A and Place the selected clothes on Person B. We want to specify which clothes to replace and if we will replace the whole outfit or just certain parts, e.g., the pants or the top. To achieve this, we have to work with image segmentation tools to find the parts of the image that represent clothes. The workflow uses the fashion segmentation custom node from https://github.com/1038lab/ComfyUI-RMBG/tree/main. Before we start the segmentation process, we remove the background from the original image of Person A to optimize the quality of the result. For this segmentation, it is better to have a higher segmentation offset so that we don’t have holes or missing parts in the image since it is used for the style reference in the FLUX.1 Redux model. Here are some examples of different segmentations for different selections:
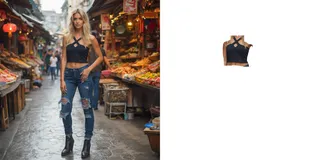
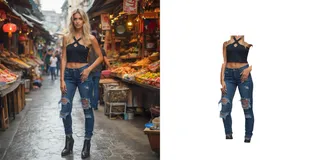
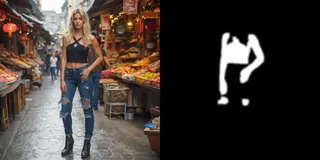
For Person B, we must create a mask for the parts/clothes where the replacement should happen. This is done by using image segmentation to generate a mask of the segmented parts of the image. This time, we use the clothes segmentation from https://github.com/1038lab/ComfyUI-RMBG/tree/main since it allows us to specify body parts and regions more freely. In this case, we also want to use a more narrow mask and a bit of blur for the mask because this mask will be used for the Flux.1 Fill model to be inpainted. The blur helps smooth edges, leading to a better output quality. Following are some examples of masks created by fashion segmentation, which allow us to also mask body parts like arms/legs that are not covered by clothes.
The segmented clothes from Person A are then used as the style reference for the flux redux model. The Flux.1 Fill model then inpaints the masked Part of Person B with a style referenced from the Flux.1 Redux model. This approach allows us to replace only the clothes and keep the rest of the Image of Person B intact. We enhance the output quality using the inpaint crop and inpaint stitch approach using this custom node: https://github.com/lquesada/ComfyUI-Inpaint-CropAndStitch. This means we crop the image to fit the generated mask, which allows for more details in the inpaint process, and then stitch the altered part back into the original image so that the rest stays the same.
Examples and Challenges
In the following section, I will provide some examples of what is possible with this workflow and some inside information on the challenges and adjustments that can be made to enhance the quality of the outputs.
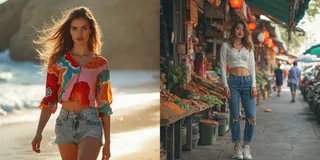
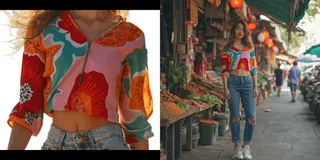
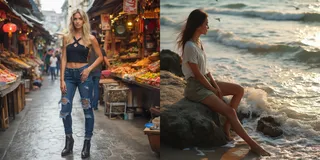
Pattern:
This can be a challenging task for AI image generation because, with patterns, we need to follow the style reference very closely; small changes in the pattern can lead to a different look. Humans are good at detecting if a pattern is matching. Even if we can see directly where the changes are, something is off. This would be bad for our use cases. So, the pattern needs to be followed very strictly. To boost performance, use the FluxFill model with weight_dtype: fp8_e4m3fn. It also helps if the style-referenced image is high resolution so many details can be detected and preserved.
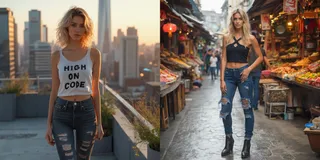
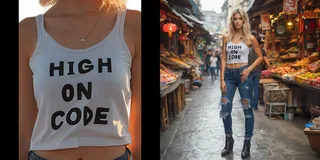
Fonts/Text:
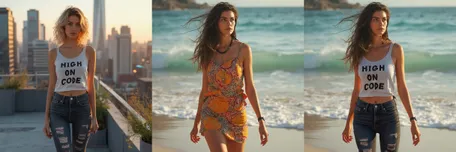
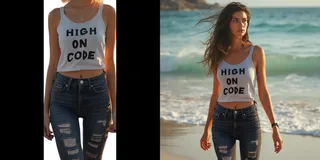
It was a massive problem for AI image generation to generate text and apply certain font styles to images for a long time. Fashion pieces use text, so for our use cases, it is possible to also inpaint with text and the correct font. This is possible with the Flux.1 Fill model. However, this can still be challenging, and some text is not fully applied at the first attempt. This can be fixed with more capable models in the future.

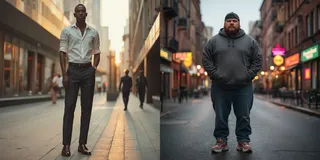
Body Types:
A Big challenge is different body types, which can be very tricky for the replacement. If you need to apply the correct body type, it can be helpful to adjust the mask sizes of your Person A image, but this can lead to a drop in the quality of the replacement itself. Here, it is best to adjust this to your needs. Or have base images with similar body type features.

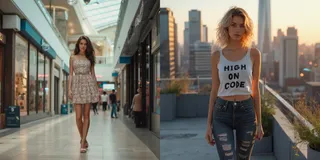
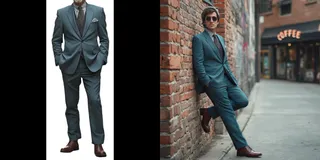
Pose/Position:
We aim to preserve as much of the original image as possible and keep the overall body position intact. This is very important for many use cases, e.g., replacing clothes for a campaign shooting. The crop-and-stitch approach used in this workflow further enhances the fact that we only change the relevant aspects of the image and try to avoid or minimize other changes to the original image.

Conclusion
FluxRedux + FluxFill are powerful models/tools that allow us to get impressive results using this ComfyUI workflow. These results can be used for the described use cases, boosting productivity and creativity. There are a lot of fine-tuning capabilities with the mask sizes and providing decent input images. Even more capable models will fix some problems/challenges; human adjustments to the workflow can correct others.
If you have any questions or even an interesting project, feel free to ping us https://9elements.com/contact/

