Continuous Integration of iOS Projects using Jenkins, CocoaPods, and Kiwi
This article explains the set up of a Continuous Integration (CI) environment for Xcode projects that use Kiwi to implement unit tests.
It shows how to configure Jenkins to set up the correct Ruby environment for CocoaPods, how to install all necessary gems and pods, and finally how to run the Kiwi specs from the command line within a Jenkins build job. The article assumes that the Xcode project is already configured to run Kiwi specs from within Xcode.
Hardware
Our CI environment runs on dedicated hardware. We took one of our unused Mac Minis, installed a fresh copy of OS X Mountain Lion (version 10.8.2 as of this writing) and created an OS X user named “jenkins”. This user is the only user on the system and the system is not used for other purposes than running a Jenkins server.
As an alternative, the CI environment could be installed in a virtual machine or even in the developer’s OS X account on her own computer. But this is not our setup and you are on your own if you want to configure this setup instead.
Setting Up Jenkins
At 9elements, we use the excellent OS X package manager Homebrew. SSH into your CI computer and install Jenkis via Homebrew:
bash$ brew install jenkinsWe want Jenkins to always run, even after an unexpected system restart. Create a new file ~/Library/LaunchAgents/org.jenkins-ci.plist with the following content:
html<?xml version="1.0" encoding="UTF-8"?>
<!DOCTYPE plist PUBLIC "-//Apple//DTD PLIST 1.0//EN"
  "http://www.apple.com/DTDs/PropertyList-1.0.dtd">
<plist version="1.0">
  <dict>
    <key>KeepAlive</key>
    <true/>
    <key>Label</key>
    <string>org.jenkins-ci</string>
    <key>ProgramArguments</key>
    <array>
      <string>/usr/bin/java</string>
      <string>-server</string>
      <string>-d64</string>
      <string>-XX:+UseG1GC</string>
      <string>-Xms512m</string>
      <string>-Xmx512m</string>
      <string>-XX:MaxGCPauseMillis=500</string>
      <string>-jar</string>
      <string>/usr/local/opt/jenkins/libexec/jenkins.war</string>
    </array>
    <key>RunAtLoad</key>
    <true/>
  </dict>
</plist>
This causes Jenkins to always launch after the OS X user “jenkins” logged into the system. The parameters for /usr/bin/java are explained in the article java - the Java application launcher. After restarting the system the user “jenkins” is not automatically logged in. Go to System Preferences → Users & Groups → Login Options → Automatic login and select the user “jenkins” from the drop-down list.
Disclaimer: We are fully aware that this allows people with physical access to the CI computer to access it without entering a password. We configured OS X to show a screensaver after 1 minute of inactivity and require the user’s password to unlock the screensaver. However, an unauthorized person with physical access could restart the computer and use this time window to access the computer. Decide on your own if you actually want to do this.
It is not possible to run application tests when Jenkins is configured via /Library/LaunchDaemons. Jenkins needs to have access to the window manager to be able to launch and interact with the iOS Simulator through the tool ios-sim (more on that later). This is the error that occurs if Jenkins is configured as a system daemon [phonegap/ios-sim/issues/5]:
bash[DEBUG] Session could not be started: Error
Domain=DTiPhoneSimulatorErrorDomain Code=2
UserInfo=0x100270b90 "Simulator session timed out."
We have not been able to successfully configure a “headless’ Jenkins (via the parameter -Djava.awt.headless=true) that can run the Kiwi specs.
Running Kiwi Specs from the Command Line
Kiwi is a nice framework for implementing unit tests in iOS projects. It allows the developer to write unit tests in the popular RSpec flavor.
Xcode knows two different types of unit test targets: application test targets and logic test targets. Application tests run inside the iOS application (simulator or device) and allow the tests to access all parts of the running application. Logic tests run outside of the application and can only test specific classes. The Xcode user interface supports both test target types. However, application tests are not supported when run from the command line. Unfortunately, Kiwi specs need an application test target to work properly. This means that running Kiwi specs within a CI environment (that needs them to be run from the command line) is not officially supported by Xcode. Two answers on Stack Overflow [SO1, SO2] provide help. It is possible to recreate the behavior when pressing CMD+U in the user interface of Xcode (where application tests are officially supported) on the command line.
Copy the Gist mbinna/RunUnitTests.sh and paste it into the “Run Unit Tests” build phase of the application test target.
Create a new scheme named “CommandLineUnitTests” for the Kiwi test target.
Select the checkbox “Shared’ and add this scheme to the VCS repository, so that it is available on the other computers that work with this repository.
Add the application test target to the section Build by pressing the + button
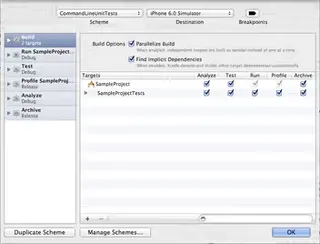
The additional scheme is necessary to run tests from the command line. xcodebuild does not provide a “test’ action that would provide the same behavior of pressing CMD+U in Xcode. The additional scheme builds the project and runs the unit tests (as can be seen in the column “Run’ in the screenshot above).
The customized script to run unit tests (configured in step 1 above) uses the tool ios-sim to install and launch applications in the iOS Simulator from the command line. Install ios-sim via Homebrew:
bash$ brew install ios-simYou can now run your Kiwi specs from the command line by invoking the follwing command:
bash$ xcodebuild -sdk iphonesimulator \ -workspace SampleProject.xcworkspace \ -scheme CommandLineUnitTests \ -configuration Debug \ RUN_APPLICATION_TESTS_WITH_IOS_SIM=YES \ ONLY_ACTIVE_ARCH=NO \ clean build 2>&1This command performs a clean build of your project and runs the Kiwi specs in the iOS Simulator afterwards. The environment variable RUN_APPLICATION_TESTS_WITH_IOS_SIM=YES is necessary to run the unit tests with the custom approach specified by the script RunUnitTests.sh. ONLY_ACTIVE_ARCH=NO ensures that xcodebuild builds all supported architectures, not only the currently active architecture. Only compiling the active architecture is often used in the configuration Debug to reduce compile times during development.
Configuring rbenv, Bundler, CocoaPods
The management of dependencies to third-party projects became much easier with CocoaPods. CocoaPods is a package manager for iOS projects that installs third-party projects. The content of the Podfile specifies which dependencies (and which version of each dependency) CocoaPods installs. We recently published an article about best practices for dealing with a CocoaPods-enabled Xcode project. CocoaPods is a Ruby gem and thus runs with the Ruby version that is installed in the system. Besides iOS, 9elements is also doing a lot of Ruby and Ruby on Rails development. Different Ruby projects may require different versions of Ruby. We want our CocoaPods to run in a controlled Ruby environment. To meet this requirement, we use rbenv (together with ruby-build) to install and switch between different versions and flavors of Ruby.
bash$ rbenv local 1.9.3-p327This sets the official Ruby 1.9.3-p327 as the local Ruby installation for our project. Be sure to check the generated file .ruby-version into your repository.
We also use Bundler to install the gems for the currently selected Ruby version. This eliminates potential problems when two or more developers use different versions of Ruby (or even different types of Ruby interpreters). The steps to setup our Ruby environment for CocoaPods are as follows:
bash$ bundle initThis creates an initial Gemfile that you can customize. Add the following to your newly created Gemfile:
bashsource "https://rubygems.org"gem "cocoapods", "0.16.0"Now you can install the gem with Bundler:
bash$ bundle installBe sure to check the two files Gemfile and Gemfile.lock into your repository. Now we can install the gems:
bash$ bundle exec pod installNow we are ready to configure our Jenkins server.
Configuring a New Job in Jenkins
Create a new job with the “Build a free-style software project” template. Fill out the required information to checkout the repository and configure the build trigger. Add a new build step of type “Execute shell”. Paste the following commands into this build step:
bash#!/usr/bin/env bash source ~/.bash_profile bundle install bundle exec pod repo update bundle exec pod install DEVELOPER_DIR=/Applications/Xcode.app/Contents/Developer xcodebuild -sdk iphonesimulator \ -workspace SampleProject.xcworkspace \ -scheme CommandLineUnitTests \ -configuration Debug \ RUN_APPLICATION_TESTS_WITH_IOS_SIM=YES \ ONLY_ACTIVE_ARCH=NO \ clean build 2>&1By default, Jenkins uses the shell /bin/sh in “Execute shell” build steps. However, we want to use our shell profile configured in ~/.bash_profile, because it contains the rbenv initialization that is necessary to actually use rbenv. The script sets the shell to be bash and uses the profile configured in ~/.bash_profile. It installs the required gems by executing bundle install followed by bundle exec pod repo update and bundle exec pod install to install the required pods. It sets the DEVELOPER_DIR to use the current stable version of Xcode. This is only needed if you installed serveral version of Xcode (stable, beta, GM, …) and want to ensure that the correct one is used in the build step. The last step invokes xcodebuild by providing the workspace, the scheme, and the environment variables necessary to properly run the Kiwi specs from the command line.
Displaying Kiwi Spec Output in Jenkins’ Web Interface
Jenkins has built-in support for JUnit test reports. The gem OCUnit2JUnit parses the output of xcodebuild and generates JUnit-style output for Jenkins.

Add the gem OCUnit2JUnit to the Gemfile:

bashgem "ocunit2junit", "1.2"and install it via
bash$ bundle installNow edit the “Execute shell” build step in the build job to pipe the output of xcodebuild to ocunit2junit:
bashxcodebuild -sdk iphonesimulator \ -workspace SampleProject.xcworkspace \ -scheme CommandLineUnitTests \ -configuration Debug \ RUN_APPLICATION_TESTS_WITH_IOS_SIM=YES \ ONLY_ACTIVE_ARCH=NO \ clean build 2>&1 | bundle exec ocunit2junitAdd a new post-build action of type “Publish JUnit test result report”. Enter “test-reports/*.xml” (without quotes) into the field “Test report XMLs”. Start a new build and check if everything is working as expected.
Conclusion
We now have a working CI environment that checks out the repository, builds the projects, and runs the Kiwi specs. This process could be much easier if Apple provided official support for running application tests from the command line. Until this happens, we use the “inofficial” solution presented here.
Let us know in the comments if there is a better way to do certain things or if something is missing in this article. You can also find me on Twitter @mbinna.
Update 1 (2012-07-11):
In order to run Xcode Application Tests from the command line and gather JUnit-compatible output for Jenkins, there is now a much better solution to the custom script mentioned above: xctool. Instead of using the script RunUnitTests.sh and piping the Xcode output to ocunit2junit, the Jenkins build job can trigger the execution of the Application Tests and generation of JUnit-compatible output like so:
bashxctool -workspace SampleProject.xcworkspace \ -scheme ExampleApp \ -reporter plain \ -reporter junit:test-reports/report.xml \ test \ -freshSimulator \ -freshInstall
