Fine Tuning Flux.1-dev Model

Fine Tuning Flux.1-dev Model
Let’s take a look at how to fine-tune a Flux.1-dev model. Flux.1 is an impressive image generation model from https://blackforestlabs.ai/ that has instantly become one of the most prominent image generation models. One significant benefit is that it can be fine-tuned with just a few images.
This post will provide a basic guide to the steps needed to fine-tune a model. But first, let me introduce you to Oscar.

Dataset preparation
For fine-tuning, you need a set of images to use for training. In this case, we aim to leverage Flux's powerful generalization capabilities and train it to generate images of Oscar in various styles and scenarios. For our training, we used 11 images of Oscar. You can view the dataset here.
We are training a LoRa for character creation, so we select images for our dataset based on the following guidelines:
Consistent Iconic Features:
Ensure all images include consistent, iconic features. In our case, this could be Oscar's "color" or "raccoon look." In other instances, iconic features might include eye color, clothing, hairstyle, or hair color.Variants in Poses and Expressions:
Include images with diverse poses and expressions, camera angles, and body positions. You may incorporate various art styles, but do not alter the iconic features defined in point one.Maximize Output with Few Images:
Before adding an image to your dataset, consider its unique benefits. Does it add variety or enhance the dataset while preserving the iconic features?Avoid Group Shots:
Exclude images where the character is part of a group with other characters, as these can dilute the focus on the main subject.General Image Quality:
Use high-quality images. Prefer lossless formats like PNGs and avoid pixelated or blurry images. Higher-resolution images are preferred as they allow for more accurate feature extraction.
The next step in preparing the dataset is to create labels or captions for the images. For the training process, we require the following structure:
plaintext-- images
---- image_1.png
---- image_1.txt
---- image_2.png
---- image_2.txt
....
The quality of labels can significantly influence the results of fine-tuning. However, labeling each image manually can be a tedious task. In our case, we used florence2 to generate the initial labels for our dataset. In our case, we just used the generated captions since the results were decent enough, but here are some key points to consider when reviewing and refining your labels:
Describe Iconic Features: Ensure that the iconic features relevant to your fine-tuning are clearly described in the label.
Remove Unnecessary Details: Omit irrelevant details about the background or style that do not contribute to the fine-tuning objective. This helps focus the process on the relevant task.
General Style Description: Include a description of the general style of the image in one place, such as "photorealistic", "anime", or "cartoon style".
Camera Angle and Position: Describe the camera angle and character position to provide more context for the model.
Trigger Word Usage: If you use a trigger word for your LoRa, ensure it is present in the label. For example, in our case, the iconic features are always linked to the trigger word OSCAR_OSFC in the labels.

Model training
We used one L40S GPU on RunPod.io to generate our labels and execute the training process. You can find more information about running a RunPod instance here.
The training process was conducted using the ai-toolkit. Before running a training session with the AI Toolkit, install all necessary dependencies.
bashgit clone https://github.com/ostris/ai-toolkit.git
cd ai-toolkit
git submodule update --init --recursive
python3 -m venv venv
source venv/bin/activate
pip3 install torch
pip3 install -r requirements.txt
To access the Flux.1-dev model, you need to log in to Hugging Face. This can be done using the huggingface-cli.
Follow these steps:
Create a token in your Hugging Face account settings.
Use the token to log in to Hugging Face by running the following command in your terminal:
huggingface-cli login
Navigate to the /config/example directory and open the train_lora_flux_24gb.yaml file.
Adjust this configuration file to suit your specific needs. Below is the configuration used to train the OSCAR_OSFC LoRa:
yaml---
job: extension
config:
  # this name will be the folder and filename name
  name: "oscar_new_v1"
  process:
    - type: 'sd_trainer'
      # root folder to save training sessions/samples/weights
      training_folder: "output"
      # uncomment to see performance stats in the terminal every N steps
      performance_log_every: 1000
      device: cuda:0
      # if a trigger word is specified, it will be added to captions of training data if it does not already exist
      # alternatively, in your captions you can add [trigger] and it will be replaced with the trigger word
      trigger_word: "OSC4R_0SFC"
      network:
        type: "lora"
        linear: 32
        linear_alpha: 32
      save:
        dtype: float16 # precision to save
        save_every: 250 # save every this many steps
        max_step_saves_to_keep: 12 # how many intermittent saves to keep
        push_to_hub: false #change this to True to push your trained model to Hugging Face.
        # You can either set up a HF_TOKEN env variable or you'll be prompted to log-in
#       hf_repo_id: your-username/your-model-slug
#       hf_private: true #whether the repo is private or public
      datasets:
        # datasets are a folder of images. captions need to be txt files with the same name as the image
        # for instance image2.jpg and image2.txt. Only jpg, jpeg, and png are supported currently
        # images will automatically be resized and bucketed into the resolution specified
        # on windows, escape back slashes with another backslash so
        # "C:\\path\\to\\images\\folder"
        - folder_path: "./images"
          caption_ext: "txt"
          caption_dropout_rate: 0.02  # will drop out the caption 5% of time
          shuffle_tokens: false  # shuffle caption order, split by commas
          cache_latents_to_disk: true  # leave this true unless you know what you're doing
          resolution: [ 512, 768, 1024 ]  # flux enjoys multiple resolutions
      train:
        batch_size: 1
        steps: 3000  # total number of steps to train 500 - 4000 is a good range
        gradient_accumulation_steps: 1
        train_unet: true
        train_text_encoder: false  # probably won't work with flux
        gradient_checkpointing: true  # need the on unless you have a ton of vram
        noise_scheduler: "flowmatch" # for training only
        optimizer: "adamw8bit"
        lr: 1e-4
        # uncomment this to skip the pre training sample
#        skip_first_sample: true
        # uncomment to completely disable sampling
#        disable_sampling: true
        # uncomment to use new vell curved weighting. Experimental but may produce better results
#        linear_timesteps: true

        # ema will smooth out learning, but could slow it down. Recommended to leave on.
        ema_config:
          use_ema: true
          ema_decay: 0.99

        # will probably need this if gpu supports it for flux, other dtypes may not work correctly
        dtype: bf16
      model:
        # huggingface model name or path
        name_or_path: "black-forest-labs/FLUX.1-dev"
        is_flux: true
        quantize: true  # run 8bit mixed precision
#        low_vram: true  # uncomment this if the GPU is connected to your monitors. It will use less vram to quantize, but is slower.
      sample:
        sampler: "flowmatch" # must match train.noise_scheduler
        sample_every: 250 # sample every this many steps
        width: 1024
        height: 1024
        prompts:
          # you can add [trigger] to the prompts here and it will be replaced with the trigger word
#          - "[trigger] holding a sign that says 'I LOVE PROMPTS!'"\
          - "[trigger] holding a sign that says 'I LOVE PROMPTS!'"
          - "[trigger] playing chess at the park, bomb going off in the background"
          - "[trigger] holding a coffee cup, in a beanie, sitting at a cafe"
          - "[trigger] building a log cabin in the snow covered mountains"
          - "[trigger] playing the guitar, on stage, singing a song, laser lights, punk rocker"
          - "hipster [trigger] with a beard, building a chair, in a wood shop"
          - "[trigger], in a post apocalyptic world, with a shotgun, in a leather jacket, in a desert, with a motorcycle"
          - "[trigger] scateboarding across a buisy city"
          - "[trigger] as a wizzard in an dungeons and dragons setting"
        neg: ""  # not used on flux
        seed: 42
        walk_seed: true
        guidance_scale: 4
        sample_steps: 20
# you can add any additional meta info here. [name] is replaced with config name at top
meta:
  name: "[name]"
  version: '1.0'
Here are the options we adjusted compared to the default example file:
trigger_word: OSCAR_OSFC
This helps the Flux.1 model retains its generalization capabilities while allowing us to trigger the LoRa specifically for the desired aspects when creating new OSCAR images.folder_path
Adjust this to the path where your images and labels are stored.steps: 3000
We increased the training steps to 3000 to create a slightly overfitted model, which works well for our specific case.prompts
Customize these to fit your needs. It's a good practice to include a variety of scenarios with different camera angles and styles in the prompts.
Running the training process
Once the configuration is finalized, run the training process with the following command:
python3 run.py config/examples/train_lora_flux_24gb.yaml
The full training process on 1 L40S GPU took around 1:45min. We specified that the model should save progress every 250 steps. These saved models can be accessed and used in a ComfyUI workflow to test and apply your trained model.
Examples of the training process
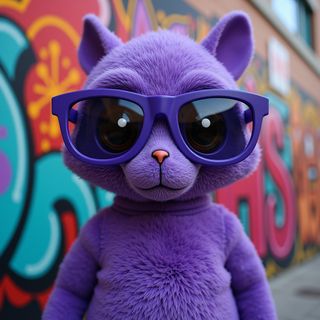
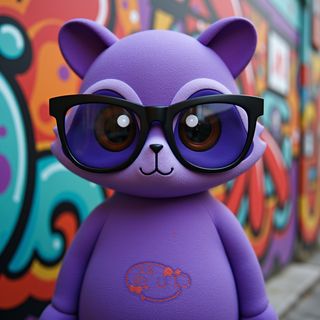
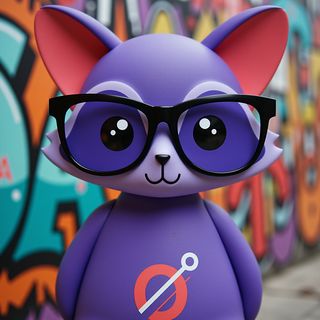
The following examples were generated using the same configuration:
Left Image: Generated using the LoRa after 250 steps.
Middle Image: Generated after 1500 steps.
Right Image: Generated with the fully trained model.
As you can see, our training resulted in a fine-tuned model capable of generating Oscar images across different scenarios and artistic styles. Additionally, the slightly overfitted model ensures a consistent generation of Oscar images, as demonstrated with the wizard example.






Conclusion and Use Cases
It’s truly remarkable that with just a few images, we can train a model tailored to our specific task while retaining the powerful abilities of the base model to generate stunning images. Even with a limited or suboptimal dataset, achieving good results is possible. Moreover, there are plenty of opportunities to refine the configurations or labels to improve the fine-tuning process further.
Fine-tuning a LoRa is an excellent way to bring consistency to AI-generated images. Here are some additional use cases where fine-tuning shines:
Fashion Product Photos
LoRas trained on your products, such as a new T-shirt collection, can generate images of AI-generated models wearing your products. This eliminates the need to hire models, book a studio, or secure outdoor locations for photoshoots, saving both time and resources.Guided Creativity
Fine-tuning enables the use of AI’s powerful image-generation capabilities to visualize ideas while maintaining consistent styles or characteristics. This guided creativity ensures that all images adhere to a cohesive artistic vision or thematic identity.Safety
Fine-tuned models offer stricter guidelines and are less likely to generate hallucinations or outputs that stray from the desired purpose. This ensures that the generated content is accurate and aligned with approved use cases, reducing the risk of harmful or inappropriate outputs. This makes fine-tuned models safer and more reliable for sensitive or professional applications.
If you have any questions or even an interesting project, feel free to ping us https://9elements.com/contact/
