Testing Angular applications

Introduction
Automated software testing is a controversial topic in the programming community. Some developers are avid proponents of testing and test-driven development. Some developers recognize the value of automated testing but consider the effort to be greater than the benefit.
I believe most developers want to write tests on a regular basis but struggle when they try to. Getting started can be hard and frustrating. The topic is inherently complicated and has a steep learning curve. The good news is that writing tests gets easier and easier with more practise.
Despite all efforts, testing is still inaccessible and arcane. To address this problem, I have published a free online book on testing Angular web applications. While it focuses on Angular, several chapters apply to all types of JavaScript-driven web applications.

The book discusses the pros and cons of different tools and techniques. In this short article though, I present an opinionated approach to Angular component testing. Every part of the article is linked to a book chapter so you can go further into a certain matter.
Testing principles
Before we dive into the coding, we need to answer some fundamental questions: Why do we test and which role plays Angular?
Automated testing means writing code that tests the implementation code. It helps shipping a robust product that works under diverse conditions.
While automated testing takes some effort, it is more efficient than manual testing in which a human checks the software by hand. Testing eventually saves time and money since it prevents bugs before they cause real damage to your business.
An automated test documents a software feature. At the same time, the test is an executable proof that the software works according to the requirements. When the test passes, this particular test setup did not reveal any bugs.
A valuable test gives you confidence that the software works for the user. If a feature is broken, a valuable test finds the bug and fails. I recommend to follow a principle popularized by Kent C. Dodds and the DOM testing library:
“The more your tests resemble the way your software is used, the more confidence they can give you.”
This means in our tests, we try to mimic the user’s behavior as closely as possible.
The Angular testing setup
Luckily, Angular’s architecture is built with testability in mind. When you create a new project with Angular CLI, two essential testing tools are installed automatically:
Jasmine, the testing library. Jasmine structures individual tests into specifications (“specs”) and suites. It allows you to perform expectations.
Karma, the test runner. Karma starts different browsers to run the Jasmine tests. The browsers report the results back.
To run the unit and integration tests, Angular CLI provides a shell command:
bashng test
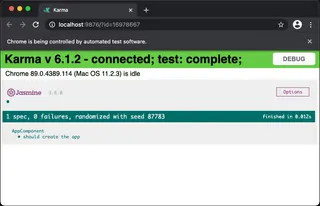
This compiles and serves the test bundle, then launches a browser to run the Jasmine tests at http://localhost:9876. We can see the output both in the browser and on the shell.
Testing components with built-in tools
Every Angular CLI application starts with an AppComponent, located at src/app/app.component.ts:
javascriptimport { Component } from '@angular/core';

@Component({
  selector: 'app-root',
  templateUrl: './app.component.html',
})
export class AppComponent {}
For simplicity, let’s assume the template, app.component.html, reads:
bashHello World!The corresponding test, located in src/app/app.component.spec.ts, looks like this:
javascriptimport { TestBed } from '@angular/core/testing';
import { AppComponent } from './app.component';
describe('AppComponent', () => {
beforeEach(async () => {
await TestBed.configureTestingModule({
declarations: [
AppComponent
],
}).compileComponents();
});
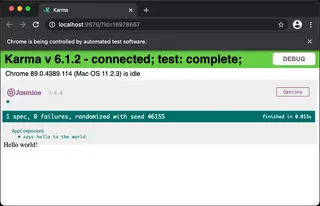
it('says hello to the world', () => {
const fixture = TestBed.createComponent(AppComponent);
fixture.detectChanges();
expect(fixture.debugElement.nativeElement.textContent)
.toContain('Hello world!');
});
});Let us dissect this example. The code declares a Jasmine test suite with describe('…', () => {…}). The suite describes the behavior of AppComponent, the component under test.
The suite contains one spec (short for specification) declared with it('…', () => {…}). The spec describes one particular feature or logical case.
In a beforeEach block, we run setup code before each spec:
javascriptbeforeEach(async () => {
  await TestBed.configureTestingModule({
    declarations: [
    	AppComponent
    ],
  }).compileComponents();
});
Angular provides the TestBed, a sandbox for testing all application parts. It comes with a testing module that works similar to a normal application module declared with @NgModule.
First, we configure the testing module. The configureTestingModule method takes a module definition, similar to what @NgModule expects. We need to declare the component, service, pipe, directive etc. under test here, and potentially its dependencies. In the code above, we simply declare the AppComponent.
Second, we call compileComponents. This instructs Angular to compile the component’s template into JavaScript code.
The test suite contains one spec (it block):
javascriptit('says hello to the world', () => {
  const fixture = TestBed.createComponent(AppComponent);
  fixture.detectChanges();

  expect(fixture.debugElement.nativeElement.textContent)
    .toContain('Hello world!');
});
The command TestBed.createComponent(AppComponent) creates a component instance and renders the template into the DOM.
createComponent returns a ComponentFixture. This is a wrapper object around the component that allows us to perform several checks and queries.
You might be familiar with Angular’s automatic change detection. Angular goes great lengths to detect changes in the component, to render the template and to update the DOM automatically.
In the testing environment however, there is no automatic change detection per default. Instead, you have to call fixture.detectChanges() manually.
This is tedious, but ultimately a good thing since it gives you more control over the rendering. Angular allows to enable automatic change detection but this works only in certain cases. I recommend to call detectChanges manually.
Last but not least, the spec contains one expectation:
javascriptexpect(fixture.debugElement.nativeElement.textContent)
  .toContain('Hello world!');
Expectations look like an English sentence: “Expect the given value to be/equal/have some other value”. The expectation starts with expect(someValue) and ends with a matcher. The most important matchers are .toBe(…), .toEqual(…) and .toContain(…).
The expectation checks whether the component renders the text “Hello world!”. Let us further dissect the chain fixture.debugElement.nativeElement.textContent:
fixture– The component fixture, a wrapper around the component instance.debugElement– The topmostDebugElement, Angular’s wrapper around the DOM element rendered by the component.nativeElement– The underlying DOM element itself.textContent– The property that returns the element’s text content as a string.
The spec we wrote does not do much, but it’s already a viable and useful test. It renders a component and checks the output in the DOM. Most component tests have a similar structure.
Testing components with Spectator
Unfortunately, writing tests this way is very tedious. Configuring the TestBed requires much boilerplate code for simple scenarios. The ComponentFixture and DebugElement abstractions turn out to be “leaky”. They force you to descend to the raw DOM level for common tasks, like checking an element’s text content.
There are two ways to fix this:
Establish your own testing conventions and write your own testing helpers
Use a well-proven testing library with baked-in testing conventions.
In the book, I explore both possibilities in depth. In this article, I recommend to use Spectator, an excellent testing library for Angular.
Spectator provides a unified API that is quick to grasp and easier to use. Spectator makes component testing a breeze. The library’s goal is to ease typical Angular testing tasks, especially when testing components. These tasks include:
Finding elements in the DOM
Simulating input
Clicking on elements like buttons, links etc.
Typing text into text fields
Set other form field values (radio buttons, select fields etc.)
Dispatching other DOM events
Setting
inputvalues and listening tooutputvalues
We’re going to test a slightly more complex component with Spectator, the CounterComponent.
The CounterComponent displays a count, which is a number. It has a button that allows the user to increment the count. The component class:
javascriptimport { Component } from '@angular/core';

@Component({
  selector: 'app-counter',
  templateUrl: './counter.component.html',
  styleUrls: ['./counter.component.css'],
})
export class CounterComponent {
  public count = 0;

  public increment(): void {
    this.count++;
  }
}
The component template:
css<p>
  <strong>{{ count }}</strong>
</p>

<p>
  <button (click)="increment()">+</button>
</p>
Let us set up the test with Spectator.
javascriptimport { byTestId, createComponentFactory, Spectator } from '@ngneat/spectator';

import { CounterComponent } from './counter.component';

describe('CounterComponent', () => {
  let spectator: Spectator<CounterComponent>;

  const createComponent = createComponentFactory({
    component: CounterComponent,
  });

  beforeEach(() => {
    spectator = createComponent();
  });

  /* … */
});
Instead of using Angular’s TestBed directly, we call Spectator’s createComponentFactory in the describe block. This function does the heavy lifting for us. Under the hood, it adds a beforeEach block that configures the testing module, just like we did manually.
createComponentFactory returns another function, createComponent. We call this function in a beforeEach block to instantiate and render the component. Spectator automatically runs the change detection, so we don’t have to call detectChanges at this point.
Now it’s time for Spectator’s unified testing API: The Spectator object! It provides several useful properties and shorthand methods we will get to know in a minute.
Before writing the test, let us contemplate what needs to be tested and how we approach the test.
It increments the count:
1. Find the strong element. Read its text content. Expect that it reads “0”.
2. Find the button element. Simulate a click on it.
3. Find the strong element. Read its text content. Expect that it reads “1”.
The question here is: How do we find the elements? If you’re familiar with the DOM, querySelector might come to your mind.
That’s a good start, but which selector do we use? How about strong and button? But what if there are several strong and button elements?
While there are several valid solutions, I recommend to use dedicated test ids in most cases. The elements get a data attribute data-testid="…" with an arbitrary name. These test ids are safe, bear no additional meaning and do not clash with existing HTML ids or classes. Browsers simply ignore them.
html<p>
  <strong data-testid="count">{{ count }}</strong>
</p>

<p>
  <button (click)="increment()" data-testid="increment-button">+</button>
</p>
We can now find the elements using Spectator:
javascriptspectator.query(byTestId('count'))
spectator.query(byTestId('increment-button'))
byTestId('…') creates a DOM selector for the given test id. The query method directly returns a DOM element.
Now that we got hold of the element, we create an expectation to ensure that the initial count is 0.
We could read the element content with element.textContent, but Spectator offers a more elegant and more readable way. Spectator adds several Jasmine matchers, among them toHaveText. This lets us write:
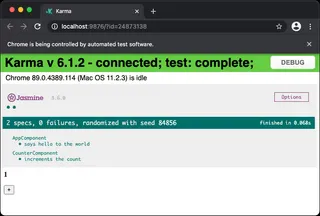
javascriptit('increments the count', () => {
  expect(spectator.query(byTestId('count'))).toHaveText('0');
  /* … */
});
Next, we click on the increment button using the handy method spectator.click. Again, we identify the element by its test id.
javascriptspectator.click(byTestId('increment-button'));Finally, we expect that the count has changed from 0 to 1:
javascriptit('increments the count', () => {
  expect(spectator.query(byTestId('count'))).toHaveText('0');
  spectator.click(byTestId('increment-button'));
  expect(spectator.query(byTestId('count'))).toHaveText('1');
});
We have successfully tested our CounterComponent. While the component is rather simple, most component tests use the same workflow.
Testing complex components
This was just a brief introduction to Spectator. The library really shines when testing complex components with Inputs, Outputs, dependencies and children.
An essential Angular feature that simplifies testing is Dependency Injection. A component is loosely coupled with its dependencies, like a service, directive or a child component. In our test, we have two options:
Test the component together with its original dependencies. This is an integration test.
Isolate the component from its dependencies. Replace the dependencies with fakes (often called mocks). This is a unit test.
Both approaches are valid and have pros and cons. They complement each other.
Creating fake dependencies manually is cumbersome, error-prone and unsafe. The fake needs to behave deterministically and needs to be in sync with the original. If it does not, the test will produce wrong results.
For creating fakes, I recommend another great library, ng-mocks. It works hand in hand with Spectator. With ng-mocks, testing complex components is easy. When declaring a dependency, you wrap it with ng-mocks. The library creates a fake that resembles the original and cannot get out of sync.
Recommendations
In this article, we briefly touched on testing principles and component testing. Angular applications have several more parts that need testing, like services, pipes as well as attribute and structural directives. Each of them has its own chapter in the book.
I’d like to close with a few high-level recommendations that represent the golden thread that runs through the book.
Write realistic tests that mimic how your users interact with the app.
Learn to write readable tests that find bugs, give confidence and are cost-effective.
Set up testing conventions for your team and your project. Cast them into code.
Understand the built-in testing tools and also use robust testing tools like Spectator and ng-mocks.
Use different types of tests that complement each other. For end-to-end tests, ditch Protractor in favor of Cypress.
Most importantly, don’t let anything or anybody discourage you. Testing is not a competition, but a way to improve your code, your coding skills and your application. A robust application lets you sleep better.
If you’d like to learn more, you can read the whole book for free:
Acknowledgements
Thanks to our clients and my colleagues at 9elements for the opportunity to work on first-class Angular applications. Thanks to Melina Jacob for designing the book cover and Nils Binder for several design contributions.

