Creating an animated SVG Neon light effect

We at 9elements organize an annual JavaScript conference called RuhrJS. The key visual shows a shaft tower and the conference name executed with a neon light effect. The main page features the full visual with flickering lights. This effect is created by using a video loop in the background. Our visual designer (Tommi Gutscher) also created some lovely images for all the sections on the website. So when the website was built, our frontend developer asked me to export some transparent .png files for her, so she can insert them in the header region.
I took a look at the files and saw that a lot of blur and shadow effects were used to create the neon light effect. To export a transparent file my first attempt was the good old:
cmd+shift+c copy merged
cmd+n create new file
cmd+v paste from clipboard
cmd+option+shift+s export for web
(pretty old school I know).

The resulting image was about 80KB large and not crisp on my high-resolution MacBook. Also, 80KB are a hell lot of bytes, especially when you’re at the conference and want to look up the schedule on a poor data plan. Somehow while doing all this, I had a strange feeling. It all felt like being thrown back about ten years.
Switching to SVG
A little frustrated I had another look at the project folder and found an Illustrator file with some very nice and clean vector paths for all the various header images. This was when I thought that maybe SVG would yield a better result. And maybe it also wouldn’t have to be static.

I don’t want to keep you on tenterhooks. The final result is about 10KB in file size, crisp on every resolution and on top of that, it’s also animated. To me, this seems much better and up do date.
Final Result
If you want to see the results just visit some of the sub-pages:
Step by step walktrough
I will take you through every step of building an animated neon sign with glow filters for yourself. You should have some basic knowledge of SVG, CSS, and Sketch. The first part is done in Illustrator and Sketch, so if you’re more of a frontend developer, just grab my demo files and start with part two.
If you’re a graphic designer and afraid of code (psssst… don’t be), it may still be interesting for you to at least read part one, because you will learn some things, your developer is going to love you for.
DOWNLOAD PROJECT FILES (ZIP 1,7 MB)
Part one: Graphic Design
1.1 From Illustrator to Sketch
I never really got comfortable with Illustrator, so my first step here will be to copy the paths from Illustrator to Sketch. So select the group you need and hit cmd + c, then switch to Sketch and press cmd + v. I don’t know when this started, but lately, when you copy from Illustrator to Sketch, it automatically creates a new Artboard. So what you see should look somewhat like this:

1.2 Deleting unused clipping masks
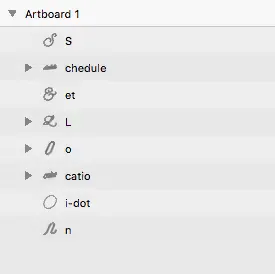
When you look at the layer panel, you see some groups with a layer named clip and another layer inside. The clip-rectangle has the exact same width and height as the layer above it and is set to Use as Mask. This happens quite often when you copy and paste paths from Illustrator to Sketch. Since both layers have the same dimensions, there is no actual masking happening so you can simply delete the clip elements and the groups. After that, your layer list will look a bit more clean:

1.3 Name and combine your layers
When you export an Artboard as SVG, the layer names get converted to id names inside the SVG. Since we want to animate some paths, it is better to know which path represents which character(s). Right now all layers are named “Fill XX” which doesn’t help much. So let’s give all of them a name, that describes their content and also change the order.
Now it’s time to think about the final image and you have to decide which elements will be animated. I chose to only animate the capital letters and the Ampersand. The other elements don’t necessarily have to be a single layer and can be combined to one shape. Again, this makes it easier when we export the file as SVG. In this example, I combined o, cation, i-dot, and n so that I have a single layer that can be named ocation. My preferred way to do the combining is by simply dragging one layer onto another.
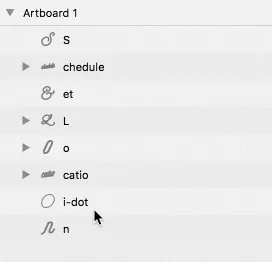
Finally, you have a very organized and neatly named layer list, that impatiently waits for some glow effects. Mine looks like this. I could have gone further and also combine chedule and ocation into a single layer, but I kept them for better readability.

1.4 Adding some glow
So far our image is a little flat. I added five shadows in total to get the desired glow effect. Three white shadows for the main glow, a black shadow to add a more depth and finally a turquoise one to cool everything down a little. After applying the shadows, we have to expand the Artboard so that everything is visible. Luckily there is the Resize to Fit option in Sketch, so the Artboard gets just the perfect size.
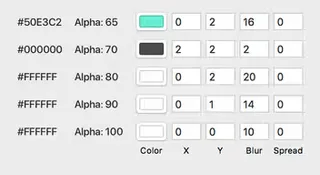

Resize the Artboard to make sure, that the whole shadow is visible.
I used a dark background to better see the effect in place, but make sure you don’t export it.
Now everything is ready to be exported as SVG. Select the Artboard, hit make exportable, choose SVG and click on export.
Hip hip hurray…part one is done. Now it’s time to leave Sketch and open your preferred text-editor.
Part Two: Frontend Development
2.1 Understanding the main SVG structure
Now that we have our SVG, we have to optimize the exported code. The main structure looks like this:
svg<?xml version="1.0" encoding="UTF-8"?>
<svg width="327px" height="178px" viewBox="0 0 327 178" version="1.1" xmlns="http://www.w3.org/2000/svg" xmlns:xlink="http://www.w3.org/1999/xlink">
    <!-- Generator: Sketch 50.2 (55047) - http://www.bohemiancoding.com/sketch -->
    <title>schedule-location</title>
    <desc>Created with Sketch.</desc>
    <defs>
        <path d="..." id="path-1"></path>
        <filter ... id="filter-2">
          ...
        </filter>
        <path d="..." id="path-3"></path>
        <filter ... id="filter-4">
          ...
        </filter>
        <path d="..." id="path-5"></path>
        <filter ... id="filter-6">
          ...
        </filter>
        <path d="..." id="path-7"></path>
        <filter ... id="filter-8">
          ...
        </filter>
        <path d="..." id="path-9"></path>
        <filter ... id="filter-10">
          ...
        </filter>
    </defs>
    <g id="schedule-location" stroke="none" stroke-width="1" fill="none" fill-rule="evenodd">
        <g id="ocation">
            <use fill="black" fill-opacity="1" filter="url(#filter-2)" xlink:href="#path-1"></use>
            <use fill="#FFFFFF" fill-rule="evenodd" xlink:href="#path-1"></use>
        </g>
        <g id="L">
            <use fill="black" fill-opacity="1" filter="url(#filter-4)" xlink:href="#path-3"></use>
            <use fill="#FFFFFF" fill-rule="evenodd" xlink:href="#path-3"></use>
        </g>
        <g id="et">
            <use fill="black" fill-opacity="1" filter="url(#filter-6)" xlink:href="#path-5"></use>
            <use fill="#FFFFFF" fill-rule="evenodd" xlink:href="#path-5"></use>
        </g>
        <g id="chedule">
            <use fill="black" fill-opacity="1" filter="url(#filter-8)" xlink:href="#path-7"></use>
            <use fill="#FFFFFF" fill-rule="evenodd" xlink:href="#path-7"></use>
        </g>
        <g id="S">
            <use fill="black" fill-opacity="1" filter="url(#filter-10)" xlink:href="#path-9"></use>
            <use fill="#FFFFFF" fill-rule="evenodd" xlink:href="#path-9"></use>
        </g>
    </g>
</svg>
So what is going on here? When you take a look at the <defs> area, you’ll see that there is a repeating pattern with a <path> and a <filter> element. Further down you’ll find another repeating pattern that contains a group (<g>) with two <use> Tags inside.
The elements inside the <defs> tag will not be rendered on the SVG-canvas. Paths and filters are defined in this section, so that they can be referenced from within the <use> tags.
In every <g> the same path is linked in both <use> tags (xlink:href="#path-1"). The first one is responsible for the glow. It is filled black and gets a filter attribute that links to a <filter> already specified in the <defs> section (filter="url(#filter-2)"). The second one is placed on top without any filter, but filled in white (fill="#FFFFFF"). Without it, you’d only see the blur but not the actual form. Maybe this sounds a little confusing, but I think when you look at the simplified code above, you will understand what is going on.
2.2 Getting comfortable with the filters
Let’s take a closer look at one of the <filter> tags. Again, you can identify some elements that form some kind of repeating pattern:
html<filter x="-56.9%" y="-145.1%" width="217.1%" height="421.1%" filterUnits="objectBoundingBox" id="filter-2">
    <feOffset dx="0" dy="0" in="SourceAlpha" result="shadowOffsetOuter1"></feOffset>
    <feGaussianBlur stdDeviation="5" in="shadowOffsetOuter1" result="shadowBlurOuter1"></feGaussianBlur>
    <feColorMatrix values="0 0 0 0 1   0 0 0 0 1   0 0 0 0 1  0 0 0 1 0" type="matrix" in="shadowBlurOuter1" result="shadowMatrixOuter1"></feColorMatrix>
    <feOffset dx="0" dy="1" in="SourceAlpha" result="shadowOffsetOuter2"></feOffset>
    <feGaussianBlur stdDeviation="7" in="shadowOffsetOuter2" result="shadowBlurOuter2"></feGaussianBlur>
    <feColorMatrix values="0 0 0 0 1   0 0 0 0 1   0 0 0 0 1  0 0 0 0.9 0" type="matrix" in="shadowBlurOuter2" result="shadowMatrixOuter2"></feColorMatrix>
    <feOffset dx="0" dy="2" in="SourceAlpha" result="shadowOffsetOuter3"></feOffset>
    <feGaussianBlur stdDeviation="10" in="shadowOffsetOuter3" result="shadowBlurOuter3"></feGaussianBlur>
    <feColorMatrix values="0 0 0 0 1   0 0 0 0 1   0 0 0 0 1  0 0 0 0.8 0" type="matrix" in="shadowBlurOuter3" result="shadowMatrixOuter3"></feColorMatrix>
    <feOffset dx="2" dy="2" in="SourceAlpha" result="shadowOffsetOuter4"></feOffset>
    <feGaussianBlur stdDeviation="1" in="shadowOffsetOuter4" result="shadowBlurOuter4"></feGaussianBlur>
    <feColorMatrix values="0 0 0 0 0   0 0 0 0 0   0 0 0 0 0  0 0 0 0.69678442 0" type="matrix" in="shadowBlurOuter4" result="shadowMatrixOuter4"></feColorMatrix>
    <feOffset dx="0" dy="2" in="SourceAlpha" result="shadowOffsetOuter5"></feOffset>
    <feGaussianBlur stdDeviation="8" in="shadowOffsetOuter5" result="shadowBlurOuter5"></feGaussianBlur>
    <feColorMatrix values="0 0 0 0 0.314369351   0 0 0 0 0.8883757   0 0 0 0 0.759899616  0 0 0 0.649371603 0" type="matrix" in="shadowBlurOuter5" result="shadowMatrixOuter5"></feColorMatrix>
    <feMerge>
        <feMergeNode in="shadowMatrixOuter1"></feMergeNode>
        <feMergeNode in="shadowMatrixOuter2"></feMergeNode>
        <feMergeNode in="shadowMatrixOuter3"></feMergeNode>
        <feMergeNode in="shadowMatrixOuter4"></feMergeNode>
        <feMergeNode in="shadowMatrixOuter5"></feMergeNode>
    </feMerge>
</filter>
Every shadow we applied in Sketch is built with three SVG filters that are combined. First there is the offset <feOffset>, then the result gets blurred <feGaussianBlur> and finally the blurred result is given a color via <feColorMatrix>. In the end, the four shadows are merged — this happens in the <feMerge> section. If you are not completely happy with the final glow effect, you can try editing the shadows directly inside the SVG instead of going back to Sketch. The stdDeviation attribute, for example, handles the blur amount while dx and dy are responsible for the x and y offset. You can also try to change the values inside the ColorMatrix, but this one is not really self-explanatory 😅.
2.3 Optimizing your SVG
Now that we understood how the SVG is structured, we can do some optimizations. The biggest one here is reducing the number of filters. Since we defined the same shadow for all paths in Sketch, one would assume, that you also only need one filter in the SVG. Sadly Sketch is not smart enough to do that, so we have to do it manually.
When you compare the defined filters, you’ll see, that they are 99% the same. So let’s try and see, what happens when we use the same filter on all <use> tags. Like this:
html<g id="schedule-location" stroke="none" stroke-width="1" fill="none" fill-rule="evenodd">
    <g id="ocation">
        <use fill="black" fill-opacity="1" filter="url(#filter-2)" xlink:href="#path-1"></use>
        <use fill="#FFFFFF" fill-rule="evenodd" xlink:href="#path-1"></use>
    </g>
    <g id="L">
        <use fill="black" fill-opacity="1" filter="url(#filter-2)" xlink:href="#path-3"></use>
        <use fill="#FFFFFF" fill-rule="evenodd" xlink:href="#path-3"></use>
    </g>
    <g id="et">
        <use fill="black" fill-opacity="1" filter="url(#filter-2)" xlink:href="#path-5"></use>
        <use fill="#FFFFFF" fill-rule="evenodd" xlink:href="#path-5"></use>
    </g>
    <g id="chedule">
        <use fill="black" fill-opacity="1" filter="url(#filter-2)" xlink:href="#path-7"></use>
        <use fill="#FFFFFF" fill-rule="evenodd" xlink:href="#path-7"></use>
    </g>
    <g id="S">
        <use fill="black" fill-opacity="1" filter="url(#filter-2)" xlink:href="#path-9"></use>
        <use fill="#FFFFFF" fill-rule="evenodd" xlink:href="#path-9"></use>
    </g>
</g>
The image still looks the same, with the same filter applied to all paths. And this is exactly what we want.
Now all the other filters that are not used anymore can be deleted. And the <defs> section will look nicely structured:
html<defs>
  <filter ...>
  <path ...>
  <path ...>
  <path ...>
  <path ...>
  <path ...>
</defs>
One final word on filters: When you export filters from Sketch, the width, height, x and y attributes of the filter get some values that don’t really make sense to me. First of all, we can change the filterUnits value from objectBoundingBox to userSpaceOnUse. The filter coordinates are now calculated from the top left of the whole SVG and not from the object that uses the filter. Now we can set the width and height to 100% and the starting x and y attributes to zero.
html<filter id="glow" width="100%" height="100%" x="0" y="0" filterUnits="userSpaceOnUse">In the end, I named the filter “glow” instead of “filter-2” to make it a bit more readable. You could also rename the paths, but having the IDs in the groups was enough for me. The only thing I did was correcting the numbers of the paths so that you have nice ascending numbers.
Of course, you can (and should) use something like SVGOMG to further reduce file size. But be careful and don’t use the Clean IDs option. This will rename all your IDs to single character names and then it will be very hard to read. With accessibility in mind I’d also recommend to leave the <title> in place and write something meaningful in there.
Here you can see the final code of the static SVG:
svg<svg xmlns="http://www.w3.org/2000/svg" xmlns:xlink="http://www.w3.org/1999/xlink" viewBox="0 0 327 178" style="background:#004">
<title>Schedule & Location</title>
<defs>
<filter id="glow" width="100%" height="100%" x="0" y="0" filterUnits="userSpaceOnUse">
<feOffset in="SourceAlpha" result="shadowOffsetOuter1"/>
<feGaussianBlur in="shadowOffsetOuter1" result="shadowBlurOuter1" stdDeviation="5"/>
<feColorMatrix in="shadowBlurOuter1" result="shadowMatrixOuter1" values="0 0 0 0 1 0 0 0 0 1 0 0 0 0 1 0 0 0 1 0"/>
<feOffset dy="1" in="SourceAlpha" result="shadowOffsetOuter2"/>
<feGaussianBlur in="shadowOffsetOuter2" result="shadowBlurOuter2" stdDeviation="7"/>
<feColorMatrix in="shadowBlurOuter2" result="shadowMatrixOuter2" values="0 0 0 0 1 0 0 0 0 1 0 0 0 0 1 0 0 0 0.9 0"/>
<feOffset dy="2" in="SourceAlpha" result="shadowOffsetOuter3"/>
<feGaussianBlur in="shadowOffsetOuter3" result="shadowBlurOuter3" stdDeviation="10"/>
<feColorMatrix in="shadowBlurOuter3" result="shadowMatrixOuter3" values="0 0 0 0 1 0 0 0 0 1 0 0 0 0 1 0 0 0 0.8 0"/>
<feOffset dx="2" dy="2" in="SourceAlpha" result="shadowOffsetOuter4"/>
<feGaussianBlur in="shadowOffsetOuter4" result="shadowBlurOuter4" stdDeviation="1"/>
<feColorMatrix in="shadowBlurOuter4" result="shadowMatrixOuter4" values="0 0 0 0 0 0 0 0 0 0 0 0 0 0 0 0 0 0 0.69678442 0"/>
<feOffset dy="2" in="SourceAlpha" result="shadowOffsetOuter5"/>
<feGaussianBlur in="shadowOffsetOuter5" result="shadowBlurOuter5" stdDeviation="8"/>
<feColorMatrix in="shadowBlurOuter5" result="shadowMatrixOuter5" values="0 0 0 0 0.314369351 0 0 0 0 0.8883757 0 0 0 0 0.759899616 0 0 0 0.649371603 0"/>
<feMerge>
<feMergeNode in="shadowMatrixOuter1"/>
<feMergeNode in="shadowMatrixOuter2"/>
<feMergeNode in="shadowMatrixOuter3"/>
<feMergeNode in="shadowMatrixOuter4"/>
<feMergeNode in="shadowMatrixOuter5"/>
</feMerge>
</filter>
<path id="path-1" d="M271.2 118.7c-2 .3-3.3-.4-3.3-2.1 0-.7.3-1.8.8-3l5.1-11.7c.8-2 3-6.9 6.7-7.4 2-.3 3.3.4 3.3 2.2 0 .6-.2 1.7-.7 2.9l-5.2 11.7c-.8 2-3 7-6.7 7.4zm-38.1-.5c-1 2-3.1 6-6.3 6.4-2 .3-3.4-.4-3.4-2.2 0-.6.3-1.7.8-2.9l5.2-11.7c.8-2 3-7 6.7-7.4 2-.3 3.3.4 3.3 2.1 0 .8-.3 1.7-.8 3l-5.5 12.7zm52-18l-5.4 12c-.9 2.3-3.6 7.9-8.5 8.5-2.7.4-4.7-.4-5.3-2.5-1.5 2-3.6 3.7-6 4-2.6.4-4.4-.4-5-2.5-1.4 2-3.5 3.6-5.8 4-3 .3-5-.4-5.5-2.6-1.6 2-3.6 3.8-6 4-2.7.4-4.5-.4-5-2.6-1.4 2-3.3 3.8-5.8 4.1-3 .4-5-.6-5.4-3a14.4 14.4 0 0 1-8.5 4.9c-6 .8-9.8-2.6-6.2-10.7l4-8.7c.9-2.2 3.5-7.8 8.2-8.4 4.1-.6 5.8 2.1 4.1 6.2l-.6 1.7c-.8 2-3.1 1.8-2.4 0l.7-1.7c.7-1.8 1.4-4.7-1.8-4.2-3.6.4-5.6 5.4-6.4 7.3l-3.7 8.4c-2.5 5.5-.7 8.7 4 8 4.8-.6 8.2-5.1 9.4-7.5l5.3-12c1-2.3 3.7-7.9 8.6-8.5 2.2-.3 4 .4 4.7 2l.7-1.7c.6-1.4 2.7-1 2 .6l-8 18.7a9.2 9.2 0 0 0-.8 3c0 1.8 1 2.4 3 2.2 3.9-.6 6-5.7 6.6-7.1l7.5-17.4-2 .2c-1.5.2-1-1.9.6-2l2.3-.4 3.5-8c.6-1.5 2.7-1 2 .5l-3 7.2 3.6-.5c1.4-.2.7 2-.7 2.1l-4 .6-7.8 18.2a9.2 9.2 0 0 0-.8 3c0 1.7 1.4 2.3 3.6 2 4-.5 6-5.7 6.7-7v-.1l8-18.7c.6-1.5 2.7-1 2 .6l-8 18.7a9.1 9.1 0 0 0-.8 3c0 1.7 1 2.3 3 2.1 4-.5 6-5.7 6.6-7.1L272 101c.9-2.2 3.6-7.9 8.5-8.5 3.3-.4 5.5.8 5.5 3.9 0 1.1-.3 2.3-1 3.8zM267.8 90c-1.2.1-1.8-.7-1.6-1.8.2-1 1.2-2.1 2.2-2.3 1.1-.1 2 .7 1.7 1.8a3 3 0 0 1-2.3 2.3zM200 105c2-.2 3.4.5 3.4 2.2 0 .7-.3 1.8-.8 3l-5.2 11.7c-.8 2-3 6.9-6.7 7.4-2 .2-3.3-.4-3.3-2.2 0-.6.3-1.7.8-2.9l5.1-11.8c.8-1.9 3-6.8 6.7-7.3m-8.5 6.4c1-2.2 3.6-7.8 8.5-8.4 3.3-.5 5.5.7 5.5 3.8 0 1.2-.3 2.4-1 3.8l-5.3 12.1c-.9 2.2-3.6 7.8-8.5 8.5-3.3.4-5.5-.8-5.5-3.9 0-1.1.3-2.3 1-3.8l5.3-12zm116.5-4c.6-1.2 2.3-.8 1.8.5-1 2.8-4.1 8-8.5 8.6-3.1.4-5-.7-5-3.8 0-1.2.2-2.4.9-3.9l5.2-12c.5-1.1.8-2.3.8-3 0-1.6-1.4-2.5-3.3-2-3.2.6-5.3 4.2-6.3 6.2L288 111c-1 2.4-4.2 8-8.8 8.6-1.5.2-1.4-1.8 0-2 3.6-.4 5.6-4.7 6.7-7.1l8.1-18.8c.5-1.3 2.4-1 2.1.3 1.1-1 2.3-1.8 3.7-2 3.3-.7 5.5.7 5.5 3.8 0 1.2-.3 2.3-1 3.8l-5.2 12a9.2 9.2 0 0 0-.8 3c0 1.7 1 2.4 3 2.1 4-.5 6-5.8 6.6-7.1z"/>
<path id="path-2" d="M140.1 143.6c-6.2.9-12.5-.9-12.5-5 0-3.6 3.7-6.3 9.7-7.1 6.4-.9 12.2 2 18.1 6.2a34.2 34.2 0 0 1-15.3 6m5.2-19.8c-8.8-3-12.8-11.5-8.7-21a27.3 27.3 0 0 1 33.1-14.5c3.7 1.4 8 3.7 10.6 7l-4.4 10.2-5 12-1.4 2.8a30 30 0 0 1-24.2 3.5m36.3-26.5l.8 1.8c.2.6.5.7.9.7.5 0 1.1-.7 1-1.2V98c-.4-1-.9-2.2-1.5-3 2.7-5.8 5.6-10.5 8.5-11 1.8-.1 2.6 1.2 2.6 4-.1 9.2-9.3 22.7-21.4 30.6l.3-.6 5-12 3.8-8.6m28.3 36.2c-1-.5-2.4.8-1 1.7 1.6 1.2 2.9 2.7 2.6 5.9-.7 5.2-6 11.4-15 12.6-15.6 2-26.7-8.4-37.5-16.3 4.4-3.7 8.4-8.7 11.9-15.4 14.1-8 25-23.5 25.1-34.3 0-4-1.4-6.3-4.4-6-4 .6-7.3 5.4-10.2 11.4a25.4 25.4 0 0 0-10.5-6.8 29.8 29.8 0 0 0-36.2 16c-4.6 10.5-.4 20.4 9.5 23.6 7.9 2.7 16.1 1.3 23.6-2.2a44 44 0 0 1-10.5 12.5c-6.4-4.6-12.8-8-20-7-5.4.7-12 4-12 9.6 0 5.5 6.8 8 14.8 6.9 5.7-.7 11.6-2.8 17-6.9l1.8 1.4c10.3 7.8 21.2 17.8 37.5 15.7 10.6-1.4 16.5-8.8 17.2-14.8.3-3.4-.9-6.2-3.7-7.6"/>
<path id="path-3" d="M210.7 66.2c0 7.8 6.3 16 20.5 14.3 13.6-1.8 21-13.6 21-20.3 0-2.1-.6-3.8-1.5-5.3 2 .8 4.2 1.4 6.7 1 5-.6 8.2-5.1 8.2-8.7 0-2-.7-3.5-2.5-4.4-1.3-.6-2.6 1.5-1.1 2 1 .6 1.5 1.5 1.5 2.7 0 2.5-2.3 5.8-6 6.3-4 .5-7.8-1.9-12-2.8-1.2-.4-2.5-.5-4.2-.4h-.4c-3 .5-6.3 2.6-8 5.7-1.2 2 .6 2.6 1.6 1.3a8.6 8.6 0 0 1 6.4-4.8h3.3c5.4 1 5.7 6.5 5.7 7.7 0 6-6.8 16.3-18.7 17.9-12.4 1.5-18.5-5.4-18.5-12.5 0-7.4 7.1-15.1 15.2-16.5h.7c.8-.2 1.1-.8 1.1-1.3s-.3-1-1.1-.8h-.5c-6.7.7-9.8-3.5-9.8-7.3 0-6.7 6.3-12.6 14.6-13.7C241 25.3 246 30 246 35c0 3.8-2.8 7.5-7.2 8.1-3.4.4-6.5-1.3-6.5-4.5 0-1 .4-1.7.8-2.4 1-1.1-.6-2-1.7-.9-.9 1.2-1 2.1-1 3.4 0 4.6 3.4 7 8.4 6.4 5.6-.7 9.1-5.6 9.1-10.5 0-5.7-6-11.3-15.1-10.1-9.4 1.2-16.7 8.2-16.7 15.8 0 3.6 2.3 7.5 6.7 8.8-7 3.3-12.2 10.6-12.2 17.2"/>
<path id="path-4" d="M131.8 46.4c.8-2 3-6.9 6.7-7.4 2-.2 3.3.4 3.3 2.2 0 .7-.3 1.7-.8 2.9l-5.2 12-.3.7c-1 2.1-3.1 6-6.4 6.4-1.9.3-3.3-.4-3.3-2.1 0-.7.3-1.8.8-3l5.2-11.7zm-17 2.2c.9-1.9 2.9-6.8 6.5-7.3 3.2-.4 2.5 2.4 1.8 4.2-1.7 4.3-3.7 6.6-7 7-1 .2-2.3-.1-2.7-.4l1.5-3.5zm71.9-9.5c.8-1.9 2.8-6.8 6.4-7.3 3.2-.4 2.5 2.4 1.8 4.2-1.7 4.3-3.7 6.6-7 7-1 .2-2.3-.1-2.7-.5l1.5-3.4zM129 65.2c2.6-.3 4.5-2.1 5.9-4 .5 2.1 2.3 3 5 2.6 2.4-.3 4.5-2 6-4 .5 2 2.5 2.9 5.3 2.5 2.5-.3 4.4-2.2 5.8-4 .5 2 2.3 3 5 2.6 2.4-.3 4.4-2 6-4 .4 2 2.2 2.9 4.9 2.5 2.8-.4 5.2-2.8 6.7-5.2.9 2.8 3.6 3.9 7.3 3.4 5-.7 9.5-5 11.2-9 .6-1.4-1.2-1.7-1.8-.6-1.2 2.4-4.6 7-9.4 7.5-4.7.7-6.5-2.5-4-8l1.2-3c.9.7 2.3 1 3.7.8 4.2-.6 7-3.4 9.3-9.2 1.6-4.1 0-6.9-4.1-6.3-4.8.6-7.4 6.2-8.3 8.4l-3.9 8.7a18 18 0 0 0-1 3.2c-.1 0-.2 0-.2.2-.6 1.3-2.7 6.6-6.7 7.1-1.9.3-3-.4-3-2.1 0-.7.3-1.8.8-3l15.5-35.8c.7-1.6-1.4-2-2-.6l-15.5 35.8c-.6 1.4-2.7 6.6-6.7 7.1-1.8.3-3-.4-3-2 0-.7.4-1.8.9-3l8-18.8c.7-1.6-1.4-2-2-.6l-8 18.7-.4.8c-1 2-3.1 6-6.3 6.4-2 .2-3.4-.4-3.4-2.2 0-.6.3-1.7.8-2.9l8.2-18.7c.6-1.6-1.5-2-2-.6l-8.2 18.7c-.6 1.5-2.7 6.7-6.7 7.2-1.9.2-3-.4-3-2.2 0-.6.4-1.7.9-3l15.4-35.8c.7-1.6-1.4-2-2-.6L143.2 39c-.7-1.6-2.5-2.3-4.7-2-4.9.6-7.6 6.3-8.6 8.5l-5.3 12c-1.2 2.4-4.6 7-9.3 7.6-4.8.6-6.6-2.6-4.2-8l1.3-3c1 .6 2.4.9 3.7.7 4.3-.6 7-3.4 9.3-9.2 1.6-4.1 0-6.9-4.1-6.3-4.8.6-7.3 6.2-8.3 8.4l-3.9 8.7a18 18 0 0 0-1 3.2l-.2.2c-.6 1.3-2.7 6.6-6.7 7.1-1.9.3-3-.4-3-2.1 0-.7.4-1.8.9-3l5.2-12c.7-1.4 1-2.6 1-3.8 0-3-2.3-4.3-5.5-3.9-1.3.2-2.5 1-3.7 2l7.3-16.6c.8-1.7-1.5-2-2-.6L85.9 62.7c-1.2 2.3-4.6 6.9-9.4 7.5-4.7.6-6.5-2.5-4-8l3.7-8.4c.8-2 2.8-6.9 6.4-7.4 3.1-.4 2.5 2.4 1.8 4.2l-.8 1.7c-.7 1.8 1.6 2.1 2.4 0l.7-1.6c1.6-4.1 0-6.8-4.1-6.3-4.8.6-7.4 6.2-8.3 8.4l-3.9 8.8c-3.6 8 0 11.4 6.1 10.6 5-.7 9.5-5 11.2-9l5.5-12.6c1-2 3.4-6 6.6-6.5 2-.2 3.3.5 3.3 2.2 0 .6-.3 1.8-.8 3l-5.3 12c-.6 1.4-.9 2.6-.9 3.8 0 3 2 4.3 5.1 3.8 2.9-.3 5.2-2.7 6.8-5.1.8 2.7 3.6 3.8 7.3 3.3 3.2-.5 6.3-2.4 8.5-4.9.4 2.5 2.4 3.4 5.3 3z"/>
<path id="path-5" d="M70.4 25.6c3.7-.5 6.6 1.6 6.6 5 0 2-1.6 5-4.7 5.6-1.6.2-1.6 2.2 0 2 4.4-.7 6.9-5 6.9-8 0-5.2-4.7-7.2-8.9-6.6-5 .6-11.8 5.8-11.8 13.6 0 7.4 4.5 13.5 4.5 20.5 0 13.4-11.5 22.6-21.7 24-10 1.2-19.1-4.5-19.1-14.8 0-9.4 6.7-18.6 17.2-20C48 45.8 52 49.7 52 55.3c0 2-.8 4.1-2.5 5.9-1.4 1.5.2 2.5 1.5 1.3 2-2.2 3.2-5 3.2-7.5 0-6.6-4.8-11.6-14.6-10.3A23 23 0 0 0 20 67.2c0 11.5 9.6 18.1 21.3 16.6 11.2-1.5 23.8-11.5 23.8-26.4 0-8-4.4-13.3-4.4-20.5 0-6.4 5.5-10.8 9.7-11.3"/>
</defs>
<g id="schedule-location" fill="none" fill-rule="evenodd">
<g id="ocation">
<use fill="#000" filter="url(#glow)" xlink:href="#path-1"/>
<use fill="#FFF" xlink:href="#path-1"/>
</g>
<g id="L">
<use fill="#000" filter="url(#glow)" xlink:href="#path-2"/>
<use fill="#FFF" xlink:href="#path-2"/>
</g>
<g id="et">
<use fill="#000" filter="url(#glow)" xlink:href="#path-3"/>
<use fill="#FFF" xlink:href="#path-3"/>
</g>
<g id="chedule">
<use fill="#000" filter="url(#glow)" xlink:href="#path-4"/>
<use fill="#FFF" xlink:href="#path-4"/>
</g>
<g id="S">
<use fill="#000" filter="url(#glow)" xlink:href="#path-5"/>
<use fill="#FFF" xlink:href="#path-5"/>
</g>
</g>
</svg>2.4 Adding animation
We’ll use CSS to animate parts of the image. If you’re planning to insert the final image via <img> you have to write your CSS directly inside the SVG file. If you want to have the styles inside your general CSS file, you need to inline the SVG, because otherwise you don’t have access to its paths.
The keyframe animation is quite simple. All you have to do is switch the opacity from something like 0.4 to 1. We want to create the effect of an old neon sign, that flickers from time to time. To achieve this, simply insert a lot of steps from 0% to 10% and then a pause to 100%:
css@keyframes flicker {
  0%    { opacity: 1;   }
  3%    { opacity: 0.4; }
  6%    { opacity: 1;   }
  7%    { opacity: 0.4; }
  8%    { opacity: 1;   }
  9%    { opacity: 0.4; }
  10%   { opacity: 1;   }
  100%  { opacity: 1;   }
}
Once this is defined, you can use it on every element you want to animate. Let’s say we want to use the defined flicker animation, and we want it to have a duration of 6 seconds. The whole animation should be played in an infinite loop and in order to mimic a flickering neon light, we don’t want to ease between the steps, but “jump” directly from one state to the next. Sounds complicated, but it is actually just one line of CSS:
css#L {
  animation: flicker 6s infinite step-end;
}
For the & I chose a duration of 5 seconds and added a delay of 2 seconds. With the two different duration timings, the whole animation looks a little more random and natural.
css#et {
  animation: flicker 5s infinite 2s step-end;
}
Well and that’s it. Our animated neon sign SVG is ready. Here you can see the full code.
See the Pen animated neon light svg by Nils Binder (@enbee81) on CodePen.
Over to you: I hope this tutorial has been useful and I’d certainly love to see some of your results.
If you’ve enjoyed this piece and would like to see more, you might want to check out our Website or follow us on Twitter.

